
Asides, Code Blocks & Diagrams
Writing high-quality technical documentation takes more than clear prose: you also need eye-catching highlights, neatly formatted code samples, and diagrams that explain at a glance. Every example on this page is live syntax — what you see is the rendered result. This page is itself a working example.
1. The Four Colored Aside Types
Asides use the triple-colon syntax: start with :::type, end with :::, and put the content in between. The site is built on Starlight and supports the four types note, tip, caution, and danger.
Syntax vs. Rendered Result
Asides Can Contain Any Content
Inside an aside you can keep using lists, code blocks, tables, and other syntax:
2. Advanced Code Block Formatting
2.1 Filename Titles and Line Highlighting
Annotate the first line of the code fence with title="file path" and use {line number} to highlight key lines:
```typescript title="src/config/site.ts" {2}export const siteConfig = { name: 'EpoCanvas Docs', // this line gets a highlighted background version: '1.2.0',};```Rendered result:
export const siteConfig = { name: 'EpoCanvas Docs', version: '1.2.0',};2.2 Code Diffs (diff)
When showing a configuration upgrade or a refactoring, the diff language makes changes obvious: lines starting with - render as removed and lines starting with + as added:
```diff export default defineConfig({- site: 'http://localhost:3000',+ site: 'https://docs.epocanvas.com', });```Rendered result:
export default defineConfig({ site: 'http://localhost:3000', site: 'https://docs.epocanvas.com',});2.3 Terminal Commands
Terminal languages such as bash, sh, and powershell render with a dark, terminal-style frame:
pnpm run build3. How to Insert Diagrams?
The current version has no built-in rendering for text-based diagram languages such as Mermaid. Writing a ```mermaid fence only displays the source as an ordinary code block; no diagram is generated.
The recommended approach: write the diagram in a tool such as mermaid.live and export it as an SVG vector image, save it to public/images/canvas/, and insert it with image syntax. The architecture diagrams and language-switching flow diagrams on this site were produced this way:
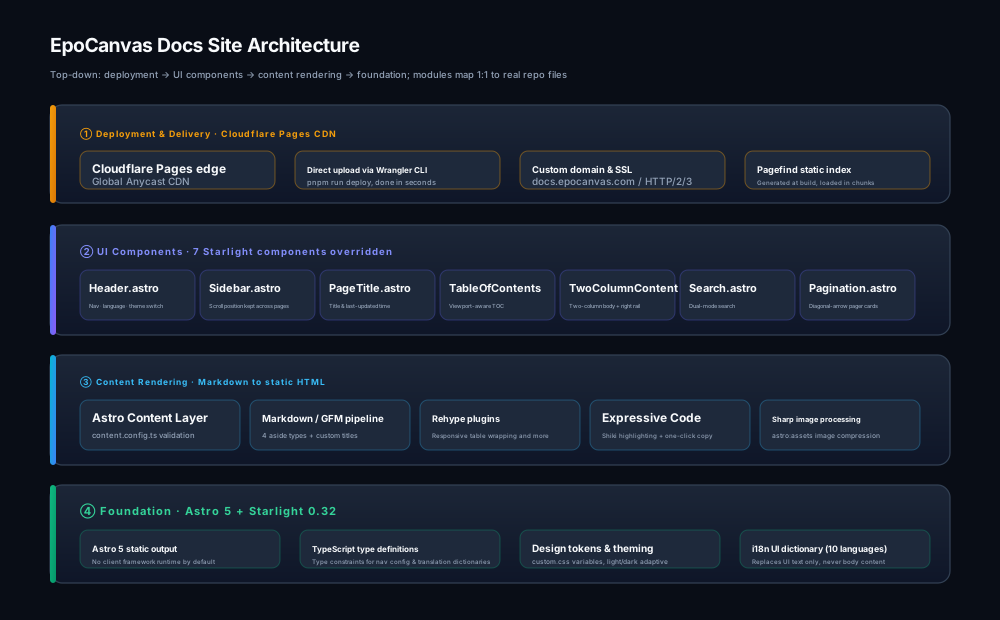
Figure: an architecture diagram inserted as an SVG image; it stays sharp at any zoom level.
If you truly need Mermaid source to render directly into a diagram, you must add an extra rendering plugin (such as rehype-mermaid) to the project. That falls under customization, so weigh the maintenance cost before adding it.
4. Other Useful Formatting
- Inline code:
pnpm run dev, rendered as monospace text in the theme color; - Keyboard keys: Ctrl + K, rendered in a keycap style;
- Task lists:
- [x] Syntax highlighting supported- [x] One-click copy supported- [ ] Built-in Mermaid rendering (planned)This renders as list items with check states.
4.1 Footnotes
To cite sources or add supplementary notes, use the GFM footnote syntax:
The static index is generated by Pagefind at build time[^pagefind].
[^pagefind]: [Pagefind documentation](https://pagefind.app/) — a local search library for static sites.
Rendered result: a numbered superscript jump marker1 appears at the end of the sentence; clicking it smooth-scrolls to the footnote list at the bottom of the page.
Used well, asides, code annotations, and diagrams greatly improve how comfortable and professional technical documents feel to read. For the complete syntax conventions, read How Rendering Works.
Footnotes
-
This is the actual footnote rendered at the bottom of this page. ↩