
Deploying to Cloudflare Pages
Once your documentation is written, you need to publish it to the public internet so your team and users can access it. EpoCanvas Docs recommends hosting on Cloudflare Pages: no server to buy, no Nginx to configure — just upload the static files and you automatically get an HTTPS certificate. This site itself (docs.epocanvas.com) was published using the method in this guide, and all dashboard screenshots below come from a real deployment.
Prerequisites
What You Need
| Item | Details |
|---|---|
| A Cloudflare account | Register for free at dash.cloudflare.com; Pages does not require a paid plan |
| A complete local build | Run pnpm run build first and confirm the dist/ directory is generated correctly, see Quickstart |
| Node.js + pnpm | The deploy commands depend on your local development environment; version requirements are the same as in the Quickstart chapter |
Choosing Between the Two Deployment Methods
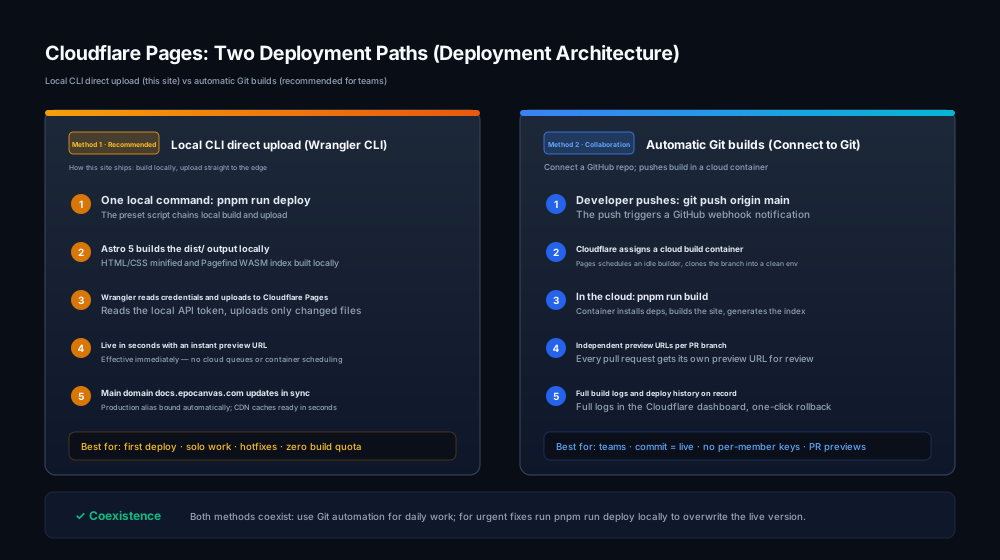
Figure: A comparison of the two Cloudflare Pages deployment paths. On the left, build locally and upload directly to the edge with Wrangler (what this site actually uses); on the right, a GitHub Webhook triggers an automatic cloud build.
| Comparison | Method 1: Command-Line Direct Upload | Method 2: Automatic Builds from Git |
|---|---|---|
| How it works | Run pnpm run deploy locally | Pushing code to GitHub triggers the build automatically |
| Difficulty | Low — two commands | Medium — one-time configuration in the dashboard |
| Best for | First launch, single maintainer, quick updates | Team collaboration, wanting “commit = live” |
| Used by this site | ✅ Yes (verifiable in the dashboard) | Not enabled; can be added at any time |
Method 1: Direct Upload from the Command Line (Recommended for First Deployment)
With this method, the site is built locally and uploaded directly to Cloudflare. It is what this site actually uses.
Step 1: Log In to Your Cloudflare Account
The project ships with Wrangler (Cloudflare’s official command-line tool). The first use requires browser authorization:
npx wrangler loginThe terminal prints Opening a link in your default browser... and the browser opens the Cloudflare authorization page. After clicking Allow, the terminal confirms the login. Verify your login state with:
npx wrangler whoamiStep 2: One-Command Build and Upload
The project presets a one-command publish script in package.json:
pnpm run deployIt runs two steps in sequence: first astro build compiles the whole site into the dist/ directory and generates the search index, then wrangler pages deploy dist uploads the output directly to Cloudflare. The real build output looks like this:
23:54:01 [build] 181 page(s) built in 20.78s23:54:01 [build] Complete!When the upload finishes, Wrangler prints a preview URL for this deployment. The project name is preset by the deploy script (--project-name epocanvas-docs), so nothing is asked interactively during deployment.
Step 3: Find Your Project in the Dashboard
Open dash.cloudflare.com and click Compute (Workers & Pages) in the left menu to see the project list. The image below marks three key spots:
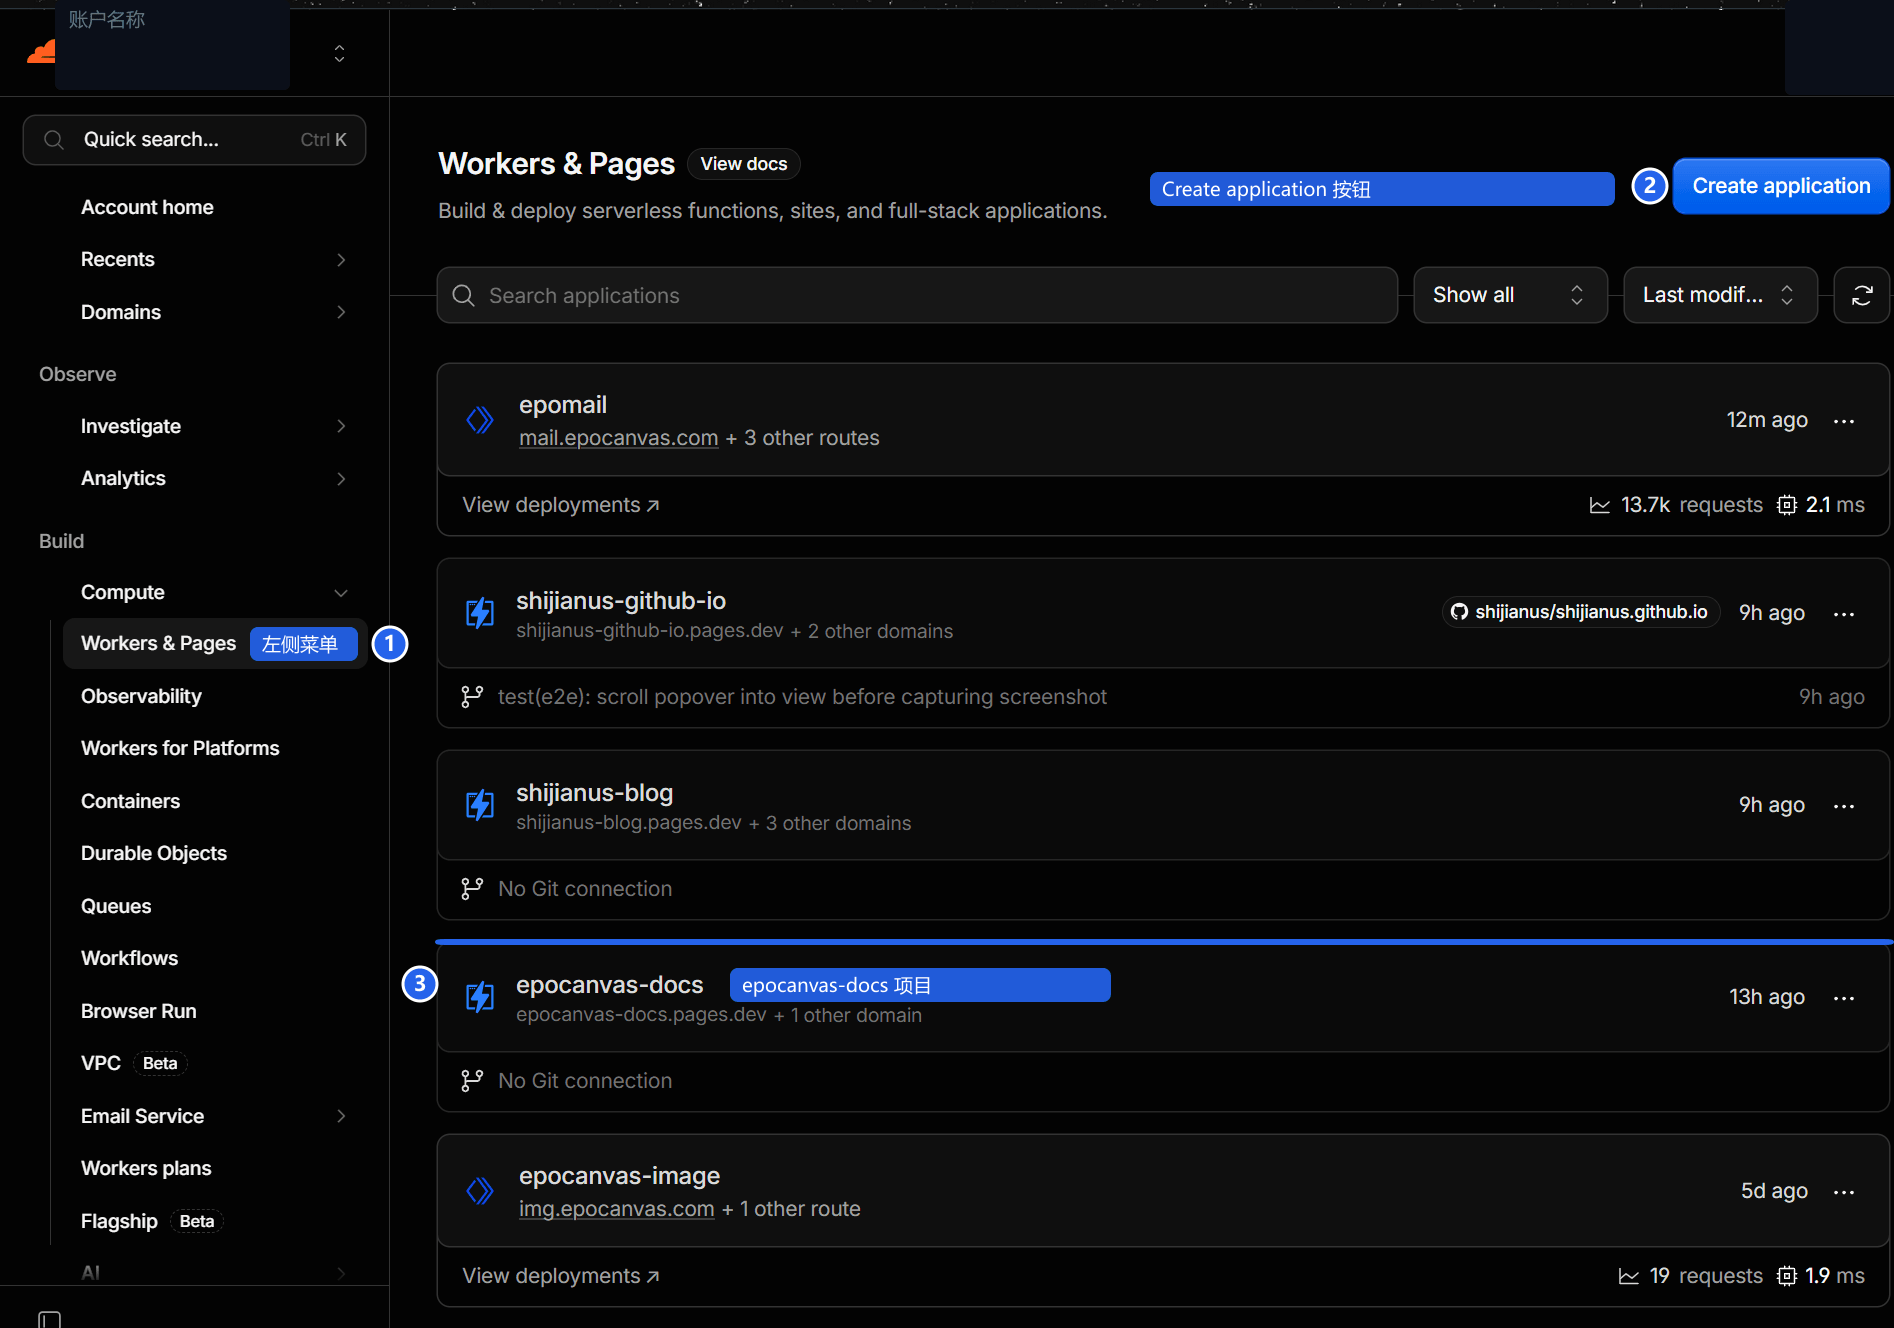
Figure: The Workers & Pages project list. ① Navigate to Workers & Pages in the left menu; ② the Create application button creates a new project; ③ our epocanvas-docs project, showing the domain epocanvas-docs.pages.dev and the most recent deployment time.
Click the project name to open the project details. The Deployments tab shows the full deployment history:
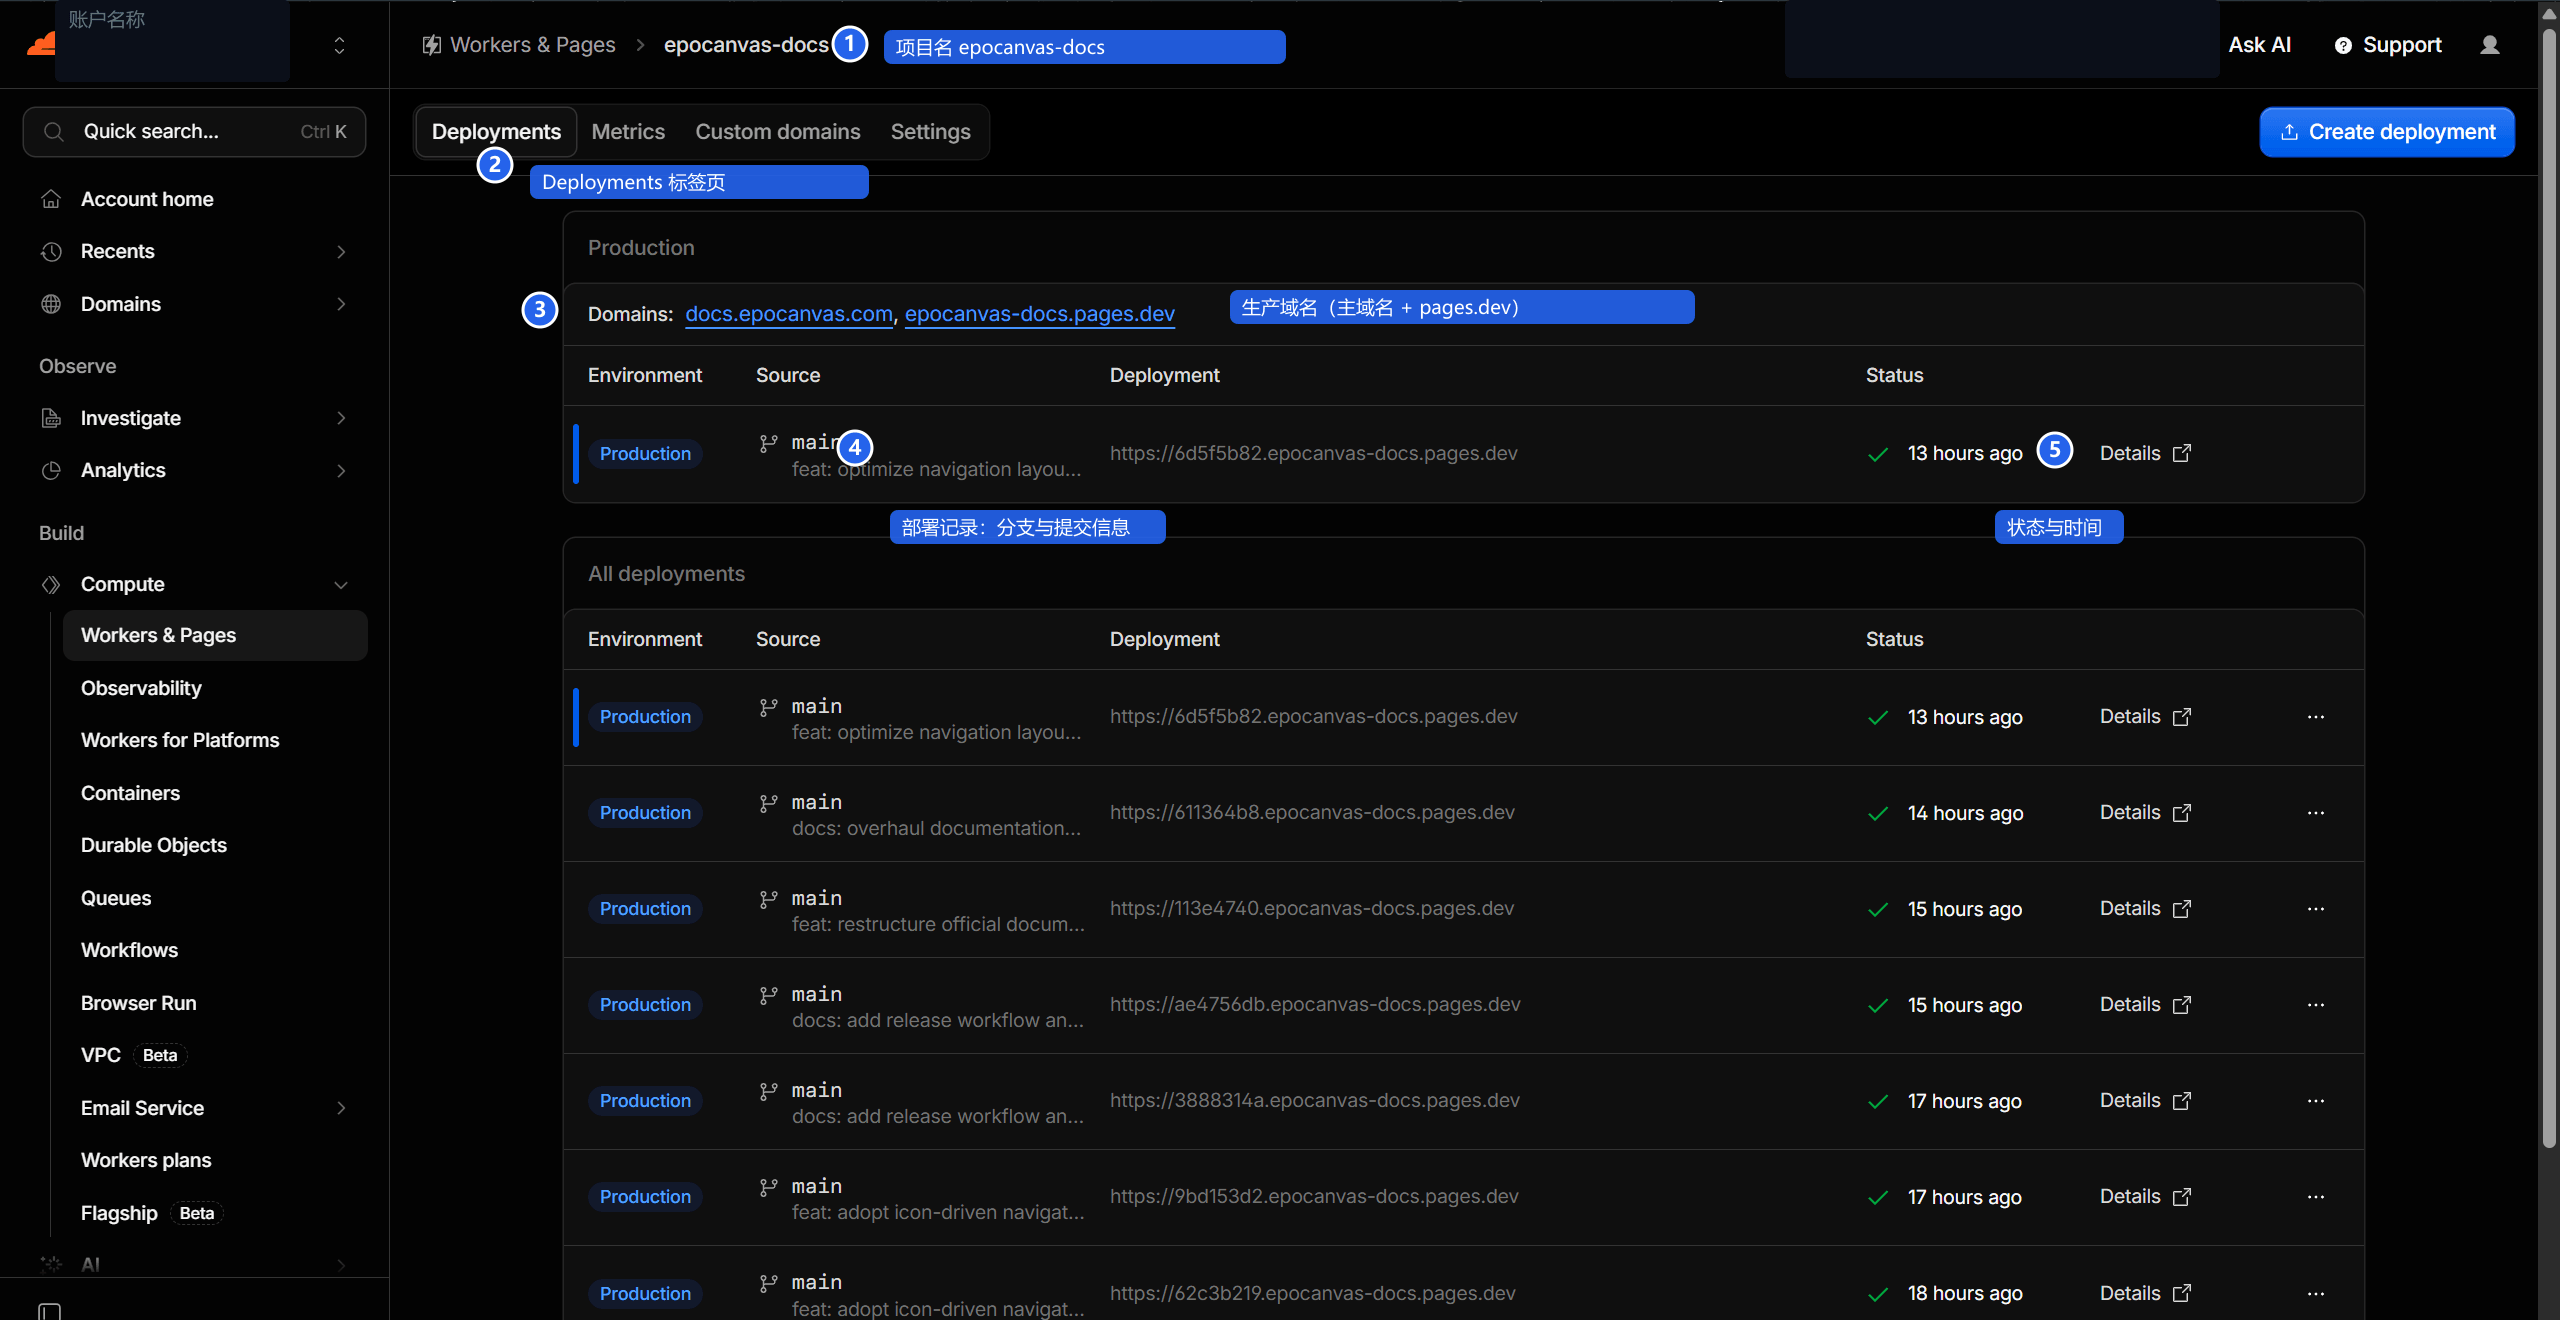
Figure: The deployment history page. ① Project name; ② Deployments tab; ③ the production domain is bound to both docs.epocanvas.com (custom domain) and epocanvas-docs.pages.dev (default domain); ④ each deployment record shows its branch and commit message; ⑤ status and deployment time.
Understanding the Build Configuration of a Direct-Upload Project
Open the Settings tab to see how a direct-upload project differs from a Git-connected one:
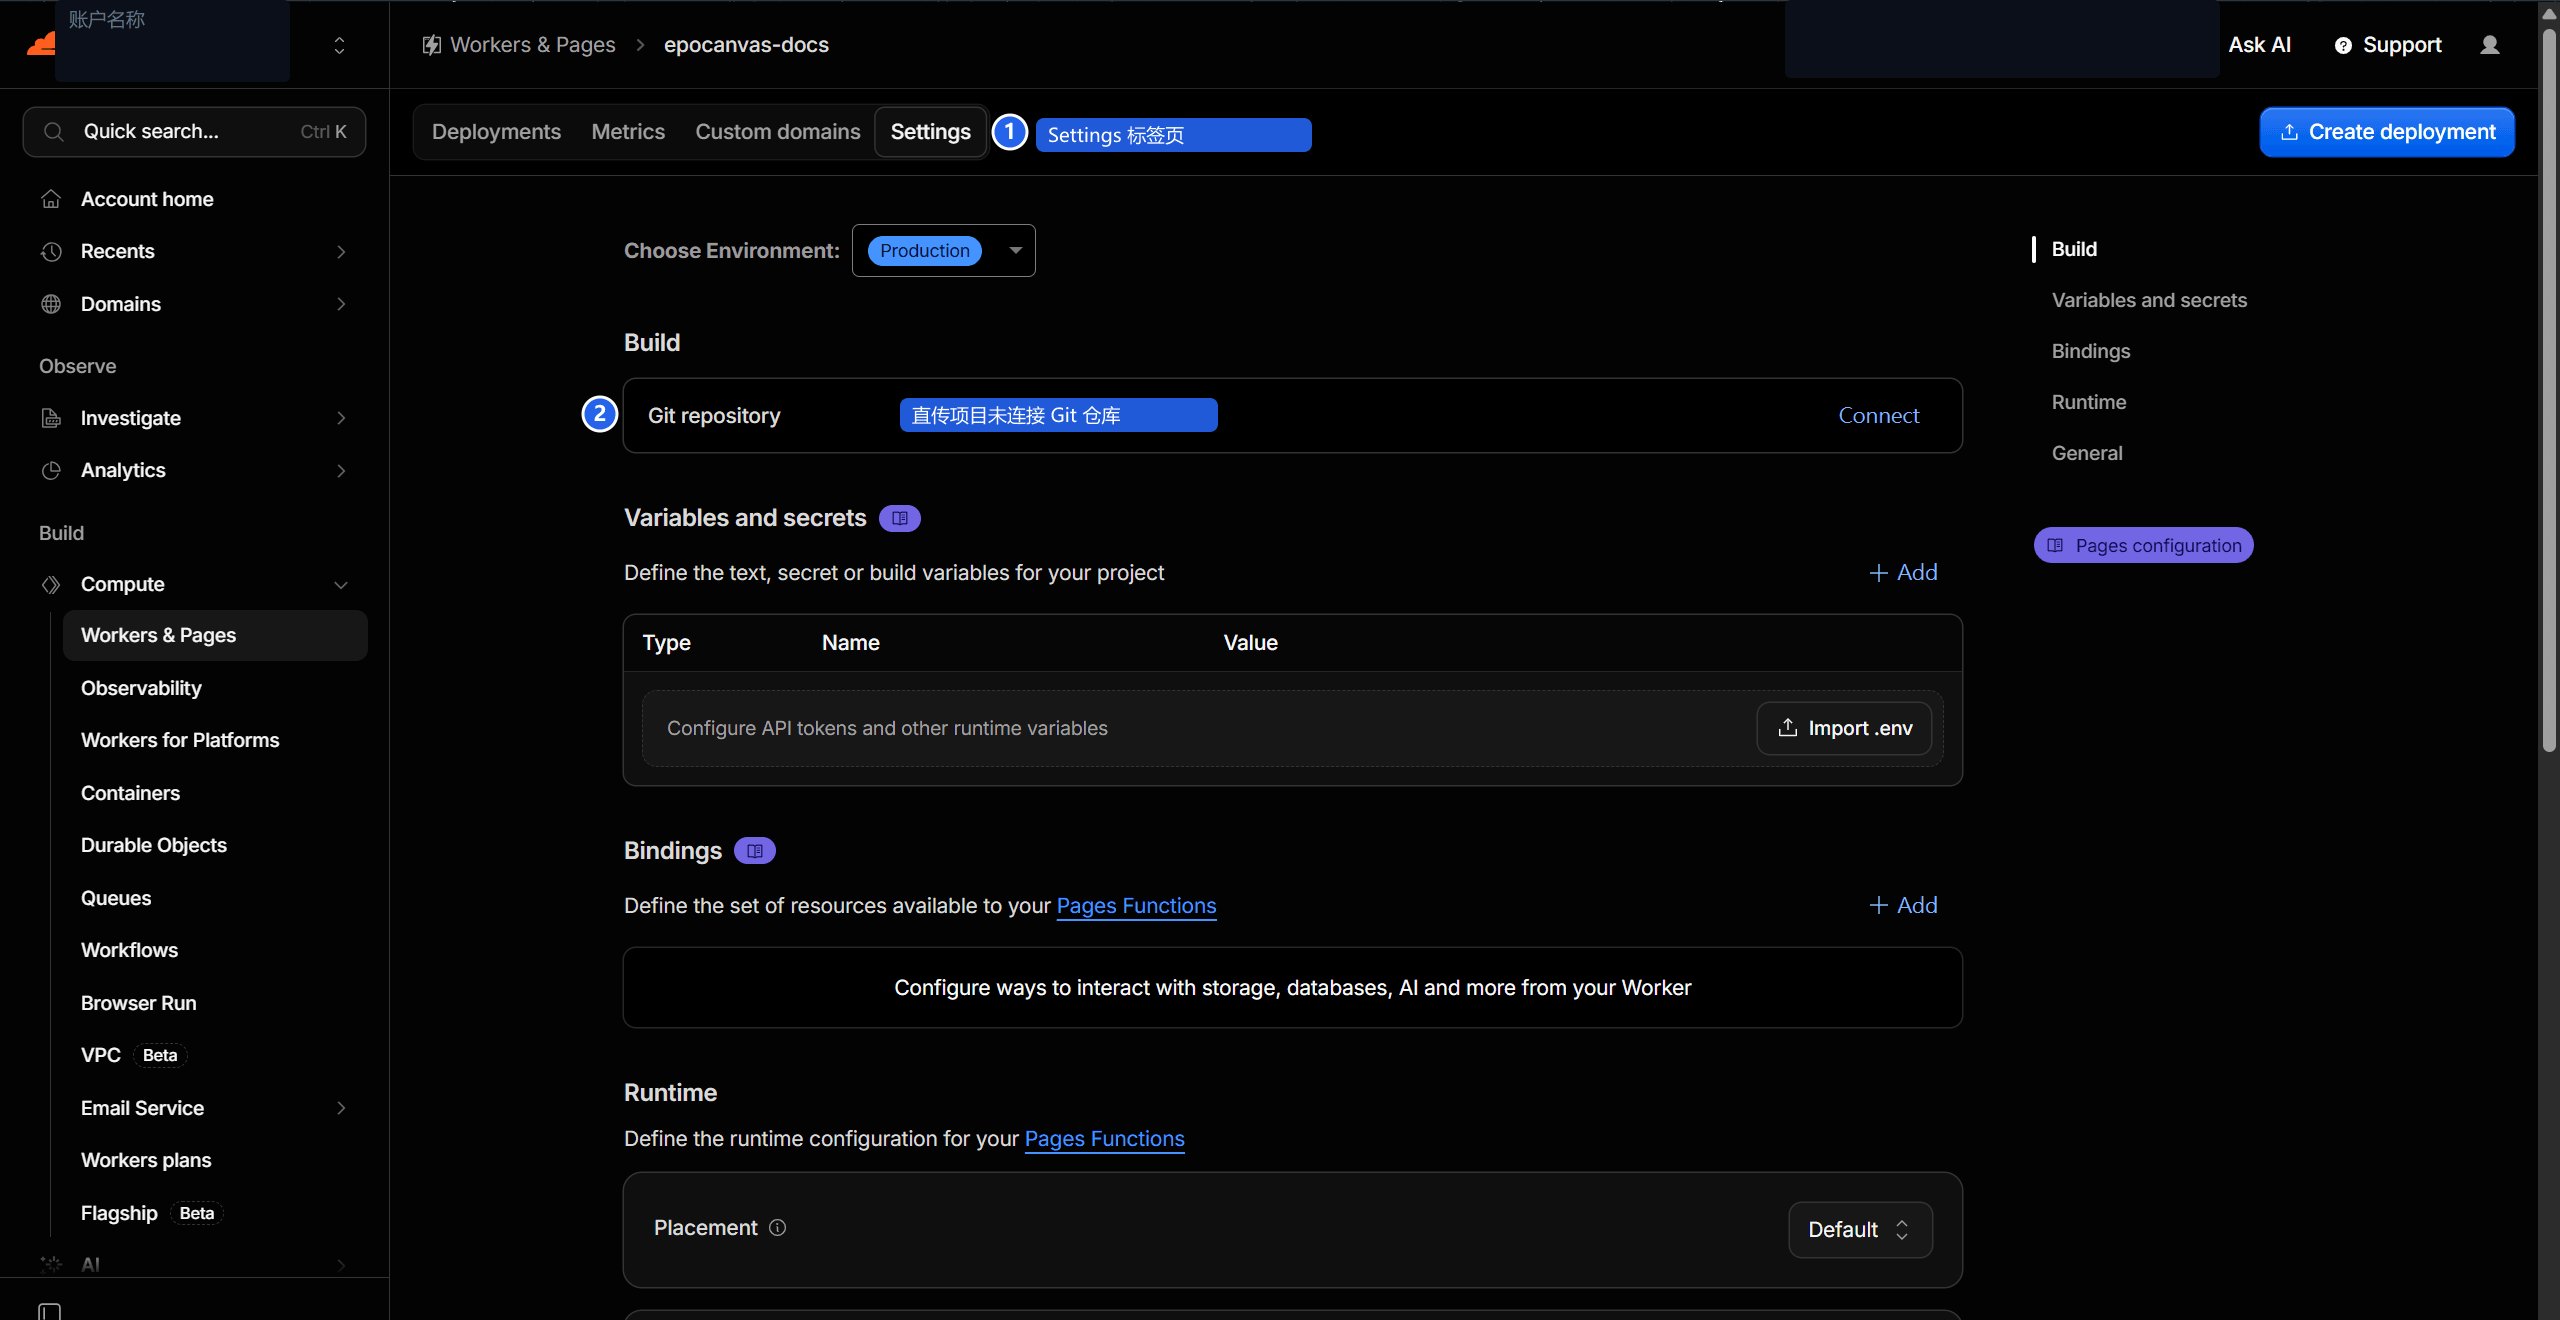
Figure: The Settings tab. ① Settings entry; ② the Git repository section shows Connect (not connected) — a direct-upload project needs no Git build configuration because the build happens entirely on your local machine.
Method 2: Connect a Git Repository for Automatic Builds (Optional)
If you want every push to go live automatically, you can connect the project to a GitHub repository and let Cloudflare build it in the cloud.
Step 1: Start the Creation Flow
On the Workers & Pages project list page, click the Create application button in the top-right corner (marked ② in the screenshot in Method 1, Step 3) and select the Pages tab.
Step 2: Connect a Git Repository
- Choose Connect to Git in the creation screen;
- Authorize Cloudflare to access your GitHub account;
- Select the documentation repository
epocanvas-docsfrom the repository list; - Click Begin setup.
Step 3: Fill In the Build Configuration
In “Set up builds and deployments”, enter the following:
| Setting | Value |
|---|---|
| Framework preset | Astro |
| Build command | pnpm run build |
| Build output directory | dist |
Step 4: Verify the Automatic Build
Click Save and Deploy and Cloudflare completes the first build automatically. Afterwards, every push to the main branch makes Cloudflare pull, build, and publish automatically. The build log for each deployment can be viewed by clicking that deployment in the project’s Deployments tab.
Bind a Custom Domain
The default epocanvas-docs.pages.dev domain assigned by Cloudflare works out of the box; binding your own domain (for example docs.epocanvas.com) takes only a few minutes.
Step 1: Open the Custom Domain Settings
In the project details, click the Custom domains tab, then click Set up a custom domain:
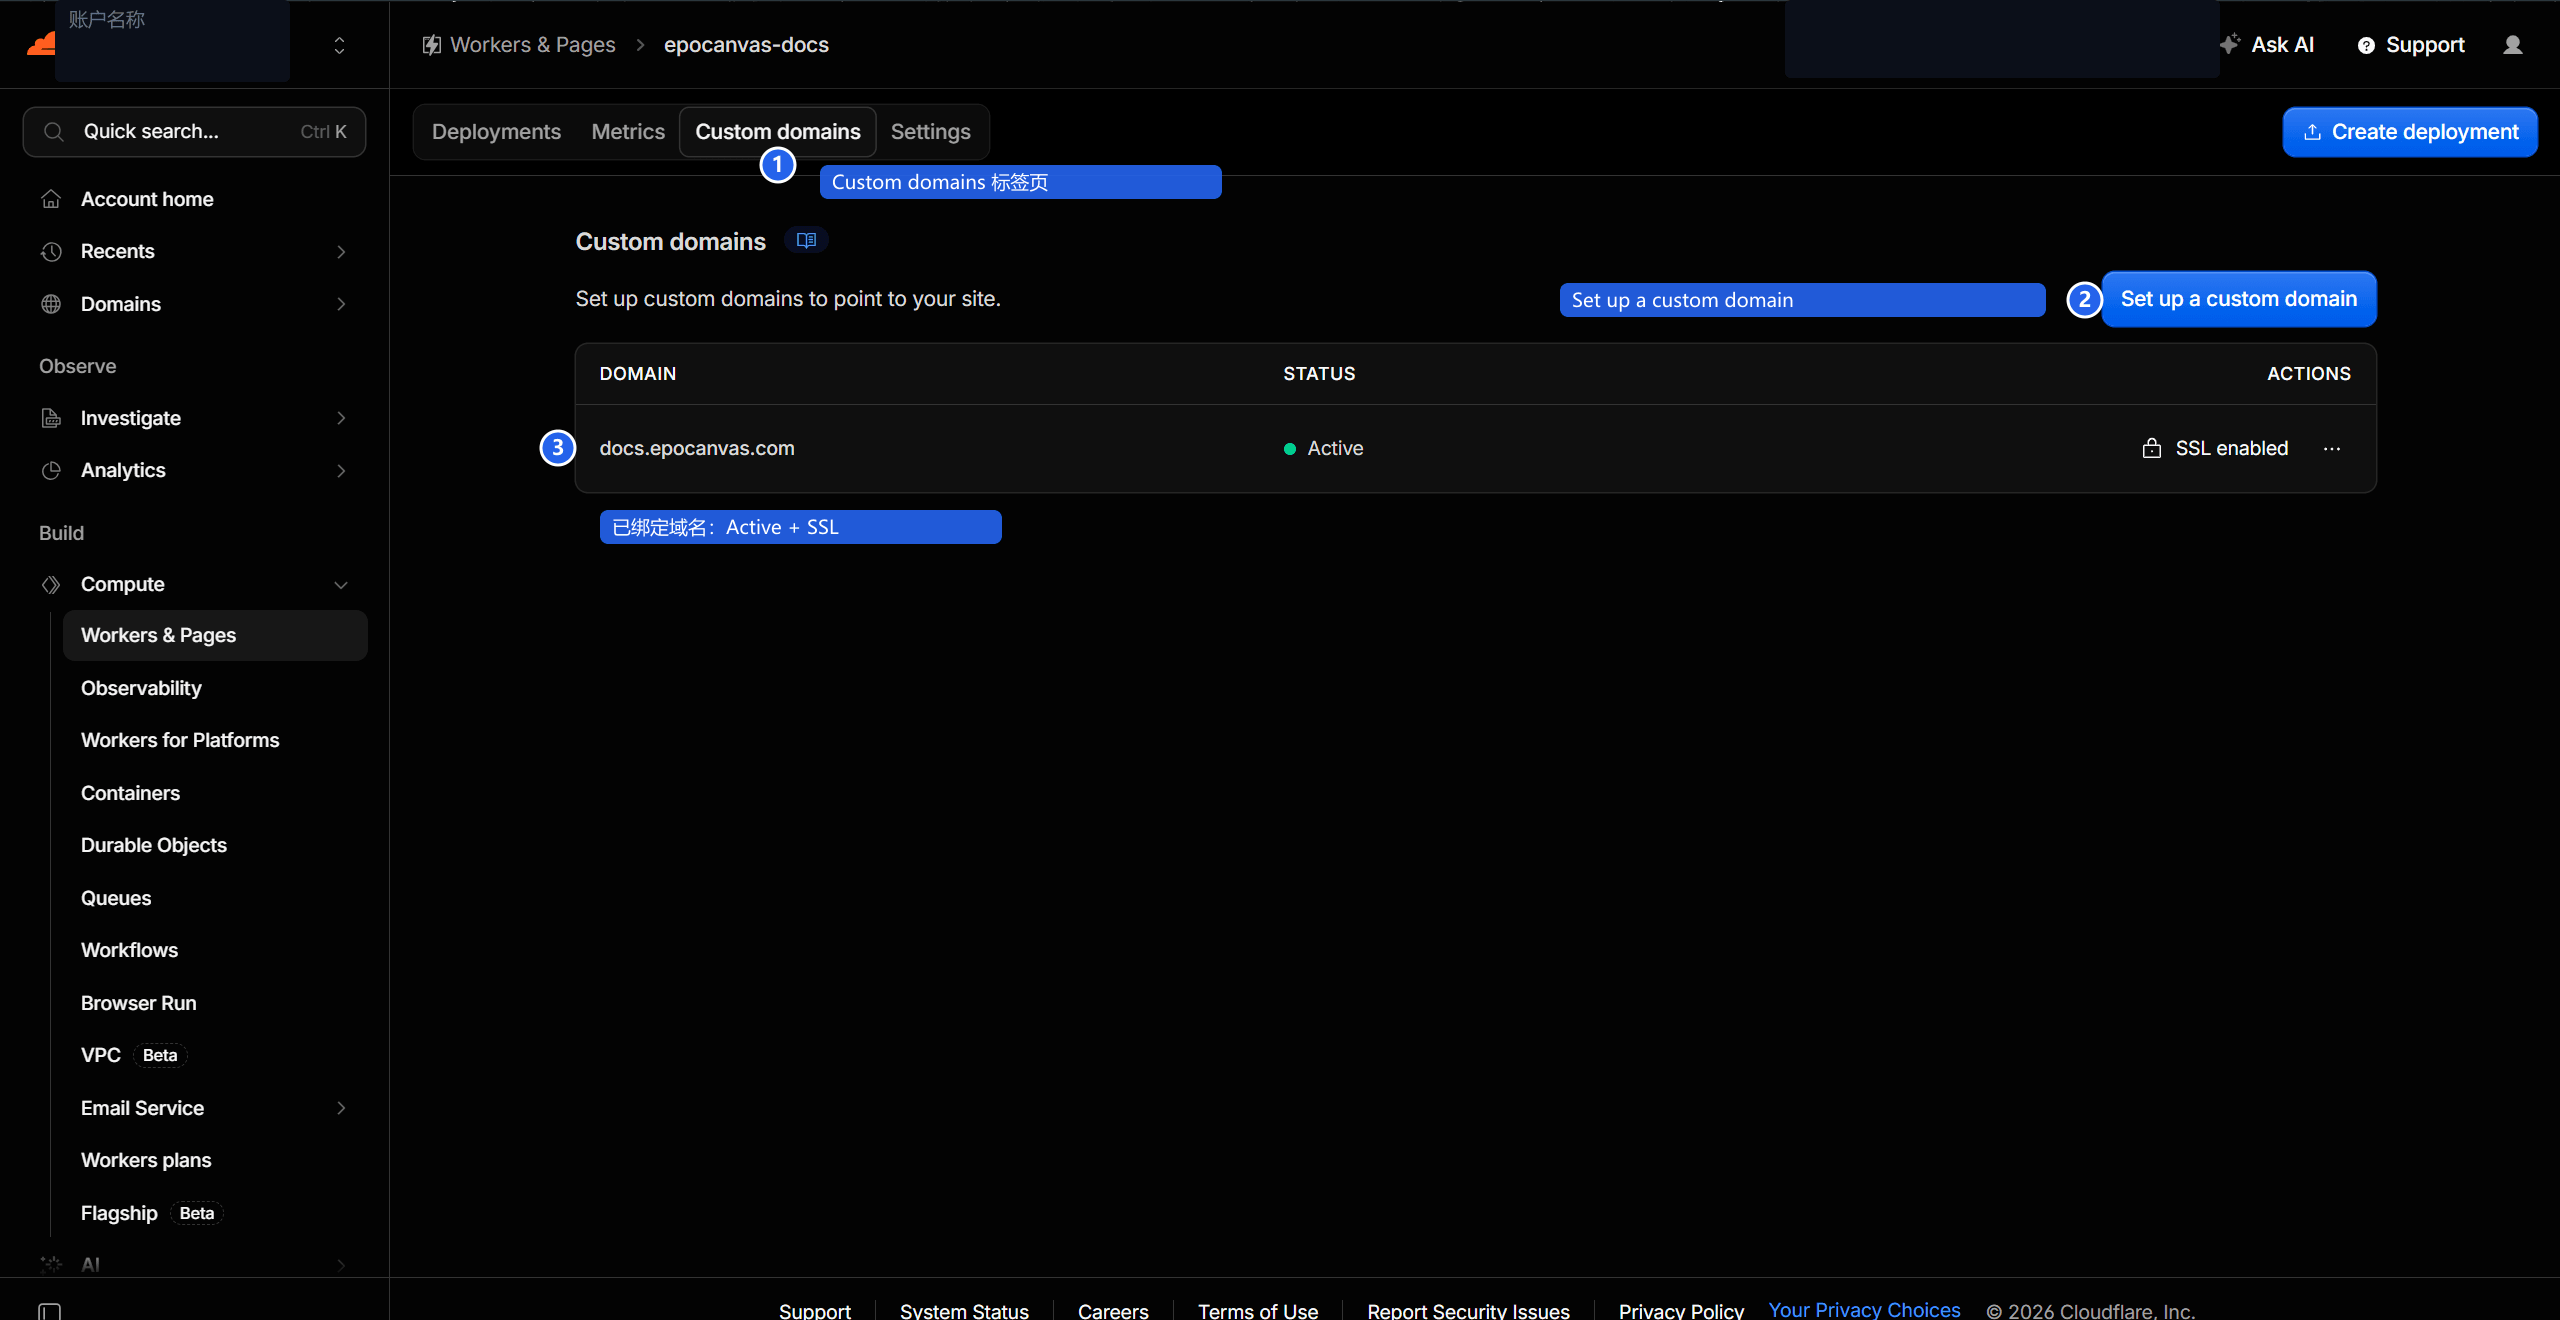
Figure: The Custom domains tab. ① Tab entry; ② the Set up a custom domain button; ③ the bound docs.epocanvas.com, with status Active and SSL enabled.
Step 2: Add the Domain and Wait for It to Take Effect
- Click Set up a custom domain and enter your subdomain (e.g.
docs.epocanvas.com); - If the domain’s DNS is already hosted on Cloudflare, the CNAME record is added automatically; for domains hosted elsewhere, add a CNAME record manually pointing to
<project-name>.pages.dev; - Wait for the certificate to be issued (usually 2–5 minutes). Once the status changes to Active (marked ③ in the image above), the site is reachable through the new domain.
HTTPS certificates are issued and renewed automatically by Cloudflare; no manual application or configuration is needed.
Verify the Deployment
Check the HTTP Status from the Command Line
curl -sI https://epocanvas-docs.pages.devThe real response:
HTTP/2 200date: Fri, 11 Sep 2026 15:32:39 GMTcontent-type: text/html; charset=utf-8A 200 means the site is healthy. After binding a custom domain, run the check again with your own domain in the URL.
Check Each Item in the Browser
| Check | Expected result |
|---|---|
| Homepage and any document page open | Page renders fully, no blank screen |
| Recent changes are live | The section you just edited is visible online |
Ctrl+K site-wide search | Finds the latest articles (the index is generated with the build) |
| Light/dark theme toggle | Switches correctly and persists after a refresh |
Common Deployment Issues
Content Not Updated Online After Deployment?
Hard-refresh the browser (Ctrl+F5 / Cmd+Shift+R) to rule out caching. If it still does not update, check the timestamp of the latest record on the Deployments page in the dashboard, then compare against the deployment preview domain with curl -sI.
Custom Domain Shows an SSL Handshake Failure (Error 525)?
Certificate issuance takes 2–5 minutes to propagate globally; wait and hard-refresh. In the meantime you can use the default epocanvas-docs.pages.dev domain.
pnpm run deploy Fails with Project not found?
First run npx wrangler whoami to confirm you are logged in; then check that the --project-name in the deploy script of package.json matches the project name in the dashboard.
For more troubleshooting, see FAQ & Troubleshooting.